

CodePush overview
CodePush is a MicrosoftApp Center cloud service that enables Apache Cordova and React Native developers to deploy mobile app updates directly to their users’ devices. It works by acting as a central repository that developers can publish certain updates (for example, JS, HTML, CSS, and image changes), and apps can query for updates from (using the provided client SDKs).
This allows you to have a more deterministic and direct engagement model with your end users while addressing bugs, adding small features that don’t require you to rebuild a binary, or redistributing it through any public app stores. All React Native apps created on App Center are CodePush enabled by default.
“CodePush allows you to change your application’s code, release it, and have your users get the new version almost immediately. The main advantage is it doesn’t require the end-user to upgrade to a new version from the app store.”
Why CodePush?
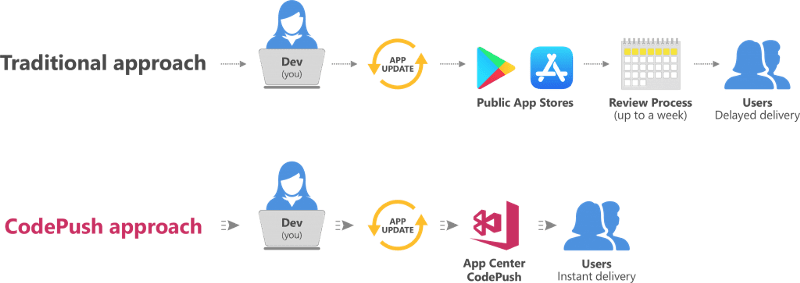
Imagine you can deliver updates for your application in minutes, whether it is to fix errors, quickly add a functionality that users have been insistently asking for or simply change the design of your application. You can easily do this using React Native CodePush library.
Here we could skip the waiting time it takes the app stores to approve the new version of your application. Also, can avoid the frustration of end-users when they find out there is yet another update they must download to get that fix or that new feature that they have been looking forward to.
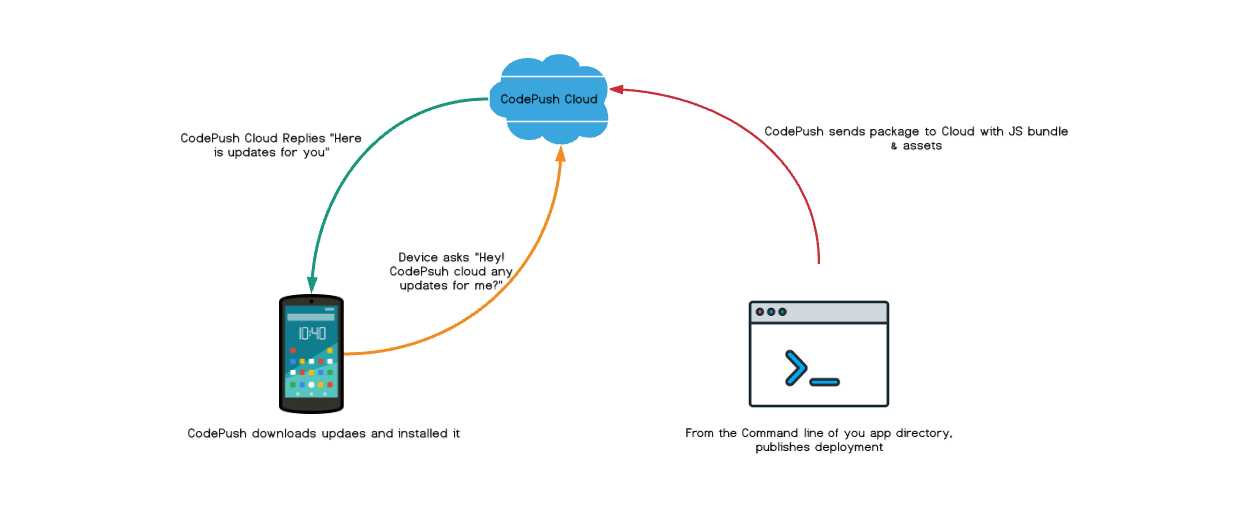
How does it work?
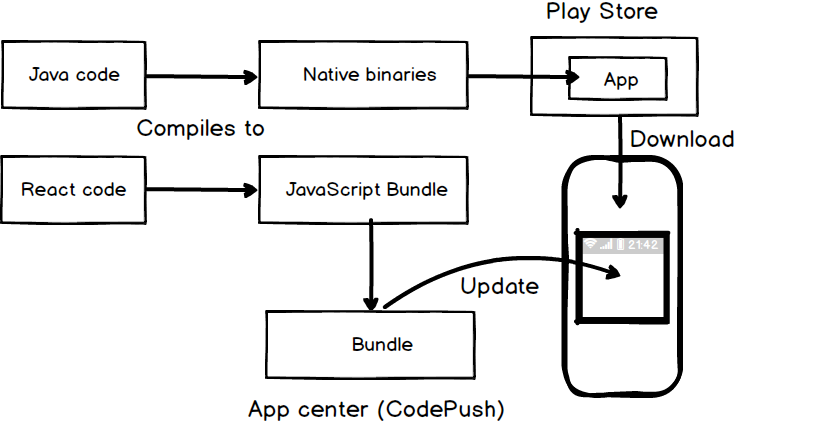
A React Native app is composed of JavaScript files and and any accompanying images, videos or other files which are bundled together by the packager and distributed as part of a platform-specific binary (i.e. an .ipa or .apk file).
Once the app is released, updating either the JavaScript code (e.g., making bug fixes, adding new features) or image assets, requires you to recompile and redistribute the entire binary, which of course, includes any review time associated with the store(s) you are publishing to.
The CodePush plugin helps get product improvements in front of your end users instantly, by keeping your JavaScript and images synchronized with updates you release to the CodePush server. This way, your app gets the benefits of an offline mobile experience, as well as the “web-like” agility of side-loading updates as soon as they are available.
In order to ensure that your end users always have a functioning version of your app, the CodePush plugin maintains a copy of the previous update, so that in the event that you accidentally push an update which includes a crash, it can automatically roll back. This way, you can make sure that your new release agility won’t result in users becoming blocked before you have a chance to roll back on the server.
Note:
Any product changes which touch native code (e.g. modifying your AppDelegate.m, MainActivity.java file, adding a new package/libary) cannot be distributed via CodePush, and therefore, must be updated via the appropriate stores.
Supported React Native platforms
- iOS (7+)
- Android (4.1+)
- Windows (UWP)
Implementation
The operation is based on wrapping our application in a HOC (higher-order component) of CodePush that is responsible for checking if there are new updates to our code in CodePush and reloading the application with new changes.
React Native CodePush uses its own server to save a copy of each CodePush deploy and a control version if a rollback is necessary. this can be done almost instantaneously. All of this is managed through a control panel provided by Microsoft, which does not only let you control the CodePush deploys but also the conventional ones. It also lets you perform simultaneous testing of the versions on a wide variety of devices and platforms.
The library has a wide variety of configuration parameters that, among other things, allow you to choose
- At what time to check and download new versions of React Native CodePush for the application.
- The possibility of using events to determine when each of these processes was completed.
For example, you can notify the end-user that a new version will be installed the next time the application is restarted.
Code push Features
- Build in the cloud
Ship CodePush hotfixes quickly from release branches directly to your deployments.
- Powerful analytics
Gain deep insights on release adoption and additional analytical data on rollbacks and install metrics.
- All new UI
Enhanced web support in the App Center portal for all the great CodePush features you use today.
- Test on real devices
Expand test coverage with automated UI tests executed on thousands of devices, all in the cloud.
- Monitor app health
Identify the root cause of issues quicker so you can quickly diagnose and fix problems in your app.
- Targeted deployments
Leverage App Center technologies to deliver updates to different demographics.
Advantages
- Deploy the code update in minutes.
- Download and update in the background.
- Configurable server inquiry mode, onOpen and onResume.
- A copy of the previous update is stored (easy rollback).
- App Center release monitor panel.
- Ideal for patch/fix updates.
- Compatible with: React Native v0.59 and earlier, Android (4.1+), IOS (7+).
Disadvantages
- Forces you to have a separate version for iOS and Android.
- Any changes that involve the native code (for example, modifying the AppDelegate.m/MainActivity.java file, adding a new library, etc.) cannot be distributed through CodePush and, therefore, must be updated through the relevant store.
- It does not support the following component properties
| Component | Props |
|---|---|
| SliderIOS | maximumTrackImage, minimumTrackImage, thumbImage, trackImage |
| Video | source |
Integrating CodePush in React Native Project
To integrate React Native CodePush into your project, you must first have an account in the Microsoft App Center.
You can create it through the following link: https://appcenter.ms/create-account After creating the account, you must create projects;
- one for Android
- one for IOS
Note:
The recommended way is to use CodePush to perform hotfixes, fix errors or graphic UI changes, because, when incorporating a new feature, in most cases, it depends on the installation of other libraries and this can be delivered by an update through CodePush.
Moreover, if adding a new feature, it is convenient to go through the testing and check-up system that the app stores (the Google Play Store and the Apple Store) provide because it is important to comply with their regulations and it is beneficial to take advantage of the feedback users provide when trying out the application with that new functionality.
Steps to integrate
- Create a CodePush account using the CodePush CLI
- Register your app with CodePush, and optionally share it with other developers on your team
- CodePush-ify your app and point it at the deployment you wish to use (Cordova and React Native)
- Release an update for your app
- Check out the debug logs to ensure everything is working as expected
Install and Setup the CLI
# Install the CLI
npm install -g code-push-cli
# Register for an account via github or email
code-push register
# Register your app.
code-push app add < appName >
Integrate CodePush plugin
- Setup React Native Project
- cd to your React Native project and install the “plugin”.
npm install --save react-native-code-push@latest
Note:
The integration experience is different for IOS and Android, so perform the appropriate setup steps depending on which platform you are targeting.
Follow the steps in the below link for platform specific integrations
If you want configure your application for multiple deployment, You can find the steps here
Customisation and configuration setup
Next, setup the sync for your component. There are more options on the syncing of the code like frequency, install, restart, installation status etc.
Example (Available sync status):
- CHECKING_FOR_UPDATE
- DOWNLOADING_PACKAGE
- INSTALLING_UPDATE
- UP_TO_DATE
- UPDATE_INSTALLED
- UPDATE_IGNORED
- SYNC_IN_PROGRESS
- UNKNOWN_ERROR
- AWAITING_USER_ACTION ..etc
You can find more options/customisation and configurations here
Integrate with React Native
Once the platform specific integrations are done, Wrap your root component with the codePush higher-order component:
For class based components
/*****/

import codePush from "react-native-code-push";

const codePushOptions = {

       checkFrequency: codePush.CheckFrequency.ON_APP_RESUME,

       installMode: codePush.InstallMode.ON_NEXT_RESUME

}

class YourAppName extends Component {

       ...// your code

}

export default  codePush(codePushOptions)(YourAppName);

/******/
For functional components
/******/

import codePush from "react-native-code-push";

const codePushOptions = {

       checkFrequency: codePush.CheckFrequency.ON_APP_RESUME,

       installMode: codePush.InstallMode.ON_NEXT_RESUME

}

let YourAppName = () =>  {

      ...// your code

};

export default  codePush(codePushOptions)(YourAppName);

/******/
Done with the integration part. Now you can build the release version on both platforms.
For iOS :
Release build configuration (check your scheme), and run in Simulator or device.
For Android :
react-native run-android --variant=release or cd android&&./gradlew assembleRelease
Push Live Code
Releasing updates via CLI
code-push release < appName > < updateContents > < targetBinaryVersion > [--deploymentName < deploymentName >] [--description < description >] [--disabled < disabled >] [--mandatory] [--noDuplicateReleaseError] [--rollout < rolloutPercentage >]
How to test?
Make some changes to your app. Perhaps change a <Text> Or a color. and then release it via codepush
Example
For iOS :
code-push release-react < appName > ios
For Android:
code-push release-react < appName > android
- Bring the app to foreground, and it should still be the same (though it has now fetched the update).
- Bring the app to background, then foreground again, and it will install the new code and reflect the changes.
Other commands:
# Release a mandatory update with a changelog
code-push release-react < appName > ios -m --description "< your code push release description >
# Release an update for an app that uses a non-standard entry file name, and also capture the sourcemap file generated by react-native bundle
code-push release-react < appName > ios --entryFile < appName >.js --sourcemapOutput ../maps/< appName >.map
# Release a dev Android build to just 1/4 of your end users
code-push release-react < appName > android --rollout 25% --dev true
# Release an update that targets users running any 1.1.* binary, as opposed to limiting the update to exact version name in the build.gradle file
code-push release-react < appName >android --targetBinaryVersion "~1.1.0"
Debugging the application
You can view the logs in the terminal if the app is using the codepush bundleURL
For iOS
Debug with running simulator
code-push debug ios
For Android
Debug with with connected android device with app running.
code-push debug android
Checking Deployment History
code-push deployment history < app name > < deploymentName >
Example: code-push deployment history MyNewApp Staging
Pitfall:
Not Getting Updates? There are quite some pitfalls as well. If you are not getting the update, make sure the version of the iOS app (in Info.plist), matches that when you code push with targetBinaryVersionmake sure the app is using CodePush.bundleURL()make sure the keys are correct, and you deploy production/staging correctly
Release Flow - A quick comparison
Traditional release flow
If you’ve ever released a mobile app or you’ve practiced CI/CD in web development, you might have a deployment flow that generally includes these steps:
- Branch out of master branch (version branch for mobile apps) to a feature branch.
- Commit some code changes.
- Review and perform tests.
- Release the feature branch as the new version of your app.
- Merge back to the master branch.
That works as well for web development as it does for mobile apps, as the generated ipa/apk file is bundled with the code changes you’ve made. As for a CodePush release though, this flow isn’t enough.
CodePush release
CodePush release only bundles certain file types. In a React Native app, this includes the various UI components and other JS files that support their functionality. Thus, changes to the native code as AppDelegate.m, MainActivity.java or even adding a new package/plugin/library, is not included in the CodePush bundle to be released.
Here the clients out there running native code that is unaware of a new plugin you’ve added. Once you deploy a CodePush bundle that tries to call the newly added plugin, your app would crash.
How can we make sure that the next CodePush release won’t break the app? There comes the Solid CodePush release flow.
Solid CodePush release flow
A CodePush release should be tested and deployed in a different manner than the traditional flow described above.
Your goal is to test the way your users experience the new CodePush release update. In order to do that, you should push the feature branch to a dedicated staging/testing CodePush environment. Then, instead of performing the tests on the feature branch itself, you should test it against the branch that represents the released native code.
Remember that your users are currently running a bundled output of the branch you initially branched from before making any changes to the code, this is the version branch. After code-pushing the feature branch to a staging/testing CodePush environment, you’ll be able to simulate the experience of an incoming CodePush bundle, exactly as your users will experience it.
Here’s an example:
- Assume you have your application (v1.0.0) released with a CodePush bundle version 1. This can be described as v1.0.0-1.
- Now, you want to release CodePush version 2 after making some code changes.
- You also want to make sure that the CodePush release won’t break any of your live v1.0.0-1
Steps
- Branch out of your v1.0.0-1 branch to a feature 1.0.0-2 branch.
- Commit some code changes. If any native changes are introduced, your app will break while running tests later.
- Review and perform tests.
- Make a CodePush staging/testing release from the 1.0.0-2 feature branch.
- Switch your local branch back to 1.0.0-1 to run the same codebase as your users do.
- Cleanup - this is how you make sure to remove all possibly installed plugins and cached files before building the project.
cd < project_root >
# cleaning node_modules and cache:
watchman watch-del-all
rm -rf ~/.rncache node_modules $TMPDIR/react-* $TMPDIR/metro* $TMPDIR/haste-*
npm install
# iOS:
rm -rf ios/Podfile.lock ios/Pods ios/build
cd ios && pod install
cd < project_root >
# Android:
rm -rf android/app/build android/.gradle
# Running Metro bundler with reset-cache:
npm start — — reset-cache
- Run the app in a staging/testing environment. The new CodePush bundle you previously released will be downloaded and installed.
- Run tests. If everything passes, then you know you have a solid CodePush release.
- Promote the CodePush release to production.
Sit back and relax. :)
Wrapping up
CodePush gives you plenty of advantages when it comes to fixing bugs and making code changes. It provides great flexibility for handling code updates and gives you control over when to install them. It also adds another dimension of complexity. So, you should simulate and carefully test the way your users will experience the upcoming release update.
You can find the official documentation by Microsoft here for latest updates and all.
Enjoy CodePush-ing to your apps ;)